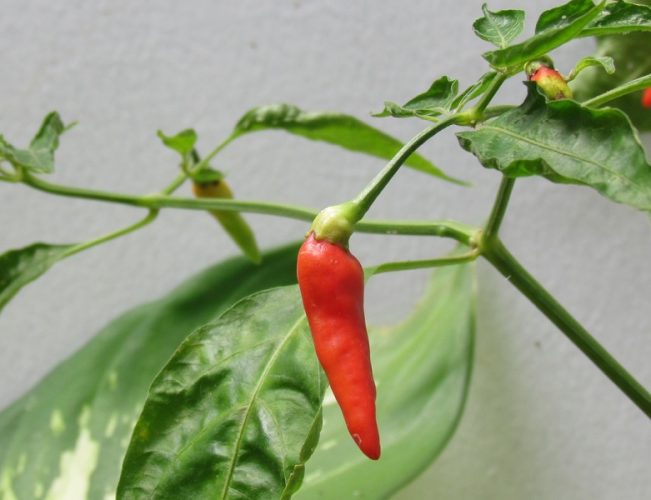
I’ve been eagerly watching my cayenne peppers turning red over the past week waiting until they were are ripe as they could get.
When I saw some of them turning black I thought something had got to them and they were going bad but actually, they were just starting to turn bright red like the guy in the top left.
The cayenne pepper in the top corner looked perfectly ripe now so I snapped it off and brought it in the house to add to a salsa I was planning to make, for the first time using my own tomatoes and peppers.
I needed to know just how spicy this pepper was so I popped a piece in my mouth as I was cutting it up. There was no waiting for results as the heat was instant. I put the pepper slice on my tongue and was immediately pleased with the heat punch. A very cool experience as my head started to sweat.
Unless I picked a Chile Grande that wasn’t fully ripe I think my cayenne peppers are hotter than they are. I will have to let the Chile Grande stay on the plant a little longer and see if they get any hotter.
One of my Cayenne Pepper Plants
We have four Chile Grande Pepper Plants
It’s the 23rd of this month and we had a really late start to our growing season due to a tropical storm and flooding. I’m hoping we get another month of good weather so all two dozen hot pepper plants get to full ripeness.
Heat-seeking, sunshine-loving peppers
Planting Peppers
Big bells pepper of red, yellow, purple, and orange, long skinny cayennes, little red-hot bullets, oval jalapeños, and stubby ramshorns—few other vegetables display such an array of shapes, sizes, and colors. What all peppers have in common, though, is a love of heat and sun. Add to that an ability to fruit abundantly in large pots, and you have one of the very best vegetables for container growing.
Native to the warmer parts of South America, peppers thrive in Texas, Mexico, and the West Indies, where the plants may reach small shrub size. But beyond the “banana belt” of southern Ontario and B.C.’s Okanagan Valley, these heat lovers can be a stretch across much of Canada. It’s all a matter of degrees. In windswept gardens, where the soil is cool and heavy, peppers may sit and shiver for weeks. But set a young plant in a big pot of light, nourishing soil, in the warmest, sunniest spot you can find— a deck or balcony sheltered by a south-facing wall, or even a greenhouse bench—and watch it grow. A location change of even a few meters can make the difference between a meager harvest and a bumper crop.
When to Start your Peppers
Any gardener who has grown tomatoes successfully from seed can manage peppers, keeping in mind that pepper seeds and plants move a whole lot slower. Late winter, i.e., mid to late March, is the time to start. Push three or four seeds a half-centimeter deep into loose moist soil—all-purpose starting mix is fine—in 8- to 10-centimeter pots. Loosely drape a sheet of clear plastic over the pots and put them someplace quite warm; small sprouts should push through in about 10 days. Once seedlings show true leaves (the second set of leaves to emerge), pinch out all but one sturdy seedling. This rough-and-ready “thinning” eliminates the job of transplanting, a step that may set seedlings back.
Planting in Pots and Pepper Care
Gather your pots and planting material
Grow pepper plants indoors in as much sun as you can manage, watering as need be. And in the meantime, gather your containers—sturdy plastic, pretty terracotta or wood. Size matters: containers should be at least 30 centimeters in diameter and about the same depth. Bigger is even better (within reason). Nursery pots leftover from shrubs or trees can be recycled for peppers, and it’s best to grow just one plant per pot.
The growing medium is as important as pot size: the soil must be light-textured, porous, and water retentive. A bagged blend is convenient, and an organic mix formulated for container vegetables is best. But we have grown peppers for years in a homemade mix of two parts sandy garden soil, one part sifted compost and one part peat moss, coir, and/or vermiculite. A handful of bone meal in each pot boosts phosphorous, a nutrient that helps with fruiting. Where the natural garden soil runs to clay, start with bagged soil since clay can “smother” roots. To facilitate watering, leave at least 3 centimeters between the soil and the container’s rim.
Caring for your plants
Pepper plants are very prone to frost damage, and even a chilly night or two will cause flowers to drop. Wait until all danger of frost is past, and night temperatures are consistently above 7°C before transferring young plants to pots for the summer and setting them outdoors. A few days of gradual exposure to the outside elements lessens the shock.
Sitting in the hot sun, containers can overheat and dry out quickly. For cooler roots and steady growth, group pots close together and check water needs daily. Peppers tell you when they’re thirsty by a slight wilting of leaves. That does no harm, but it’s better to act before the fact. To prevent mildew, water soil rather than plants. Pour on a monthly dose of liquid fertilizer formulated for vegetables, or insert organic fertilizer spikes into the soil according to directions at planting time.
- BENEFITS: All purpose fertilizer designed to be used throughout the growing season that provides readily available nutrients AND extended, long lasting nitrogen (Product contains 50% SLOW RELEASE NITROGEN (SRN))
- BONUS: Micro-nutrients aid in plant growth, aesthetic appeal, and overall plant health.
- DIRECTIONS FOR ORNAMENTALS: Mix 1-2 oz of fertilizer to 1 gallon of water and water plants generously. Use fertilizer once every two weeks. DIRECTIONS FOR TURF: Use 3 oz. of fertilizer for every 1000 sq. ft. Mix in a spray tank at ratio of 1-3 oz per gallon of water. Fertilize once every 2-4 weeks.
- GUARANTEED ANALYSIS: 18% Nitrogen | 3% Available Phosphoric Acid | 6% Soluble Potash | .05% Copper .1% Iron .05% Manganese .05% Zinc
- ALL PURPOSE: 10-10-10 with Aminos (5.5%) & Seaweed Extract is a generic liquid fertilizer designed for all stages of plant growth.
- USE SITES: Great for gardens, flowers, fruits, vegetables, turf grasses etc. Is suitable for indoor & outdoor use
- USAGE RATES: 1-2 oz per gallon of water (it's better to start at a lower rate and work your way up) | Water generously & continue use every 1-2 weeks
- HIGH CONCENTRATE: Makes up to 32 gallons of fertilizer
- MEASURE & POUR: Comes in an easy measure and pour bottle that allows the end-user to measure and pour a specific dosage by simply squeezing the bottle. See images for directions.
- Instantly feeds all indoor houseplants
- For all indoor plants, including edibles
- Feeds instantly
- Able to apply directly to the soil or can mix with water
- Apply once a week
A bonus? Well-grown container peppers, with their shiny fruit dangling against dark green leaves, are as decorative as any other potted plant on your deck, porch, or patio.
Going Green
There’s no such thing as a green pepper—or more precisely, a pepper that stays green. All peppers start out some shade of green—either dark, light, or yellowish—and gradually turn red, yellow, orange, or even purple as they mature and sweeten. A green pepper, like a green tomato, is simply unripe.


