Gardening – Propagation Tips
Propagation
Propagation through cuttings is a popular option for propagating cultivars to an identical form and is used for trees and shrubs. Pull gently on the stem to test for rooting; it has rooted if lodged firmly. Cuttings can be made in the stem, leaf, and root forms. Stem cuttings are the method most often used of hardwood-, soft tip- or semi-hardwood types.
To increase your plant population through propagation is challenging, satisfying, and cheaper than buying from nurseries.
Different forms of Plants Propagation
Growing From Seeds
The seed is a popular option and most plants can be multiplied by sowing. In some cases it is better to buy seed from a reputable seed-house; for certain cultivated plants’ seed will not result in an identical plant to the parent.
Seed can be sown in a tray with 1 part sand, 1 part peat moss, and 1 part sieved topsoil.
Scatter seed over the growing medium and cover to a depth of its diameter.
– Water with a fine spray and cover with black plastic or hay.
– Remove coverage with the first appearance of germination.
Fine seed should be sown in sand mixed with peat moss. Mix equal quantities of sand and seed thoroughly and spread over the firmed-down, growing medium (in a plastic seed tray). Immerse the tray into shallow water and let the soil suck moisture up. Remove from water when the upper layer of soil darkens and cover with newspaper.
Remove the newspaper after germination and place the tray in a garden frame. Provide 50% shade by using a cloth over the frame. Using chicken wire stretched around/over upright poles and shade cloth can make a simple garden frame.
Prick out seedlings when they are ±2cm high or have two true leaves and plant out in containers, ensuring adequate spacing.
The planting out in the garden should be done when the young ones are growing strong, differing in heights from plant to plant.
Growing Plants From Cuttings
Cuttings
Are a popular option for propagating cultivars to an identical form and are used for trees and shrubs. Pull gently on the stem to test for rooting; it has rooted if lodged firmly. Cuttings can be made in the stem-, leaf- and root forms. Stem cuttings are the method most often used of hardwood-, soft tip- or semi-hardwood types.
Semi-hardwood cuttings
Are taken during summer and will take 3 – 8 weeks to root. Make the cutting 15cm long, with a bud near the top, and place in a pot containing river sand, protect from sunlight and keep moist.
Hardwood Cuttings
Are taken before the growing season and will take ±5 weeks to root. Ensure the top is just above a bud. Place these cuttings in river sand with 5cm emerging above the sand. Keep moist, mulch with hay, and provide sun protection.
Soft Tip Cuttings
Should be 10 cm long and taken in spring. Rooting may take place within in week to two weeks and keep constantly moist. The bottom cut should be made just beneath a node and the growing tip removed. Remove the foliage of- and plant the lower half in a pot with river sand.
Leaf Cuttings
Are probably the method least used, except in the case of certain plants where it’s the only option of cutting propagation. With a sharp knife, make cuts into the veins at broad intervals before lying down flatly. Use containers filled with fine, sifted sand.
Leaf cuttings for certain succulents are much easier, even with only portions of the leaf. Insert the leaf piece just slightly into the soil and use hairpins to secure the veins tightly against the soil. Leave the pot untouched until new plants are visible.
Root Cuttings
Are taken in early summer from growing roots 5cm long and 1cm thick. This process takes months of patience and should be left until rooted thoroughly. Use pots with balanced sand and peat moss to lay the cuttings horizontally and cover with 2 – 3cm of growing medium. Provide protection…
A Division
Is done in different seasons for different plant types. Wait for the sun to set and dig the plant(s) up carefully. Gently pull it apart into sections with adequate roots for each section. Replant these divided sections in prepared holes. Water thoroughly and regularly for the next month.
Budding
Is ideally done on overcast days. Prepare the bud stick, with a sharp knife, for insertion. Using a knife cut the stem’s T-incision and inserts the bud. Tie in with bud tape.
Grafting
Is similar to budding and ideally done right before- or during the growing season. The basic principle of grafting is the perfect alignment of rootstock and shoot, held together tightly with a rubber band. Choose rootstock from a healthy plant with a sturdy stem of at least 1cm thickness. Cut and level the stem. Cut the stem between two buds, taking off a strip as wide as your shoot and angled into the stem.
When deep and long enough, make a sharp upwards/outward cut. Take a tip cutting with two leaves and copy the cut-out part of the rootstock to create a tight fit. Match up the growing layers of both and bound tightly with grafting tape. There are several methods of grafting and some are best done in the greenhouse.
Layering
Is ideally done at the beginning of autumn and it could take some time before you can lift the new plants. Select long, elastic stems for layering. Cut a bud, on the outside of the bending sections. Secure the stem down with pegs, replace it with river sand around the cut and fill with soil, leaving the stem’s end above ground level. This method ensures nutrients from the parent plant while rooting. Once rooted it can be cut into sections of new plants.
Read More: Tips And Tricks To Help You Grow Your Plants Big And Strong
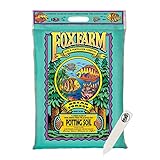
- Ultimate potting soil that has everything your plants need in one bag
- Ocean Forest is pH adjusted at 6.3 to 6.8 to allow for optimum fertilizer uptake
- Ocean Forest has a light, aerated texture that's perfect for indoor and outdoor plants
- Designed for containers and ready to use right out of the bag
- The date imprinted on the bag signifies the product's manufacturing date
- NATURAL AND ORGANIC NUTRIENT RICH FERTILIZER: We’re on a mission to get America growing again and it all starts with what’s right beneath us — your soil; Grow a bountiful garden in your home with the Back to the Roots All-Purpose Peat-Free Potting Mix, packed with the nutrients needed for your plants, flowers, succulents, and vegetables to thrive
- ROOT BOOSTING AND MOISTURE RETAINING MYCORRHIZAE, YUCCA EXTRACT, AND COCONUT COIR: This organic potting soil has mycorrhizae, coconut coir, and yucca extract which enhances the plant's and root's uptake of water and nutrients required for growth; You're bound to have a thriving indoor and outdoor garden in no time
- INCLUDES pH BALANCING DOLOMITIC LIMESTONE: The dolomitic limestone of this all-purpose potting soil has a combination of calcium carbonate and magnesium carbonate which effectively neutralizes acidity and prevent nutrient deficiency
- GREAT FOR YOUR PLANTS AND THE PLANET: The Back to the Roots All-Purpose Potting Mix is the 1st premium, 100% peat-free soil in the market; Mined peatlands contribute yearly CO2 emissions equivalent to what cars all over the world are releasing — that’s why we think it’s so important to leave peat alone
- ZERO-RISK GARDENING: Made in the USA and 100% Guaranteed to grow; All of our soils come with 100% satisfaction guarantee - if you have any problems, we will send you a new bag to get you growing
Growing Plants from Cuttings
Growing plants from cuttings allow you to share plants with friends and get them from friends. It is so easy to create a brand new plant from cuttings that you’ll find yourself wanting to propagate many of your garden and indoor plants this way.
The key to growing plants from cuttings is to select a very healthy plant from which to prune a cutting. Use very sharp pruners or scissors to remove young shoots from the parent plant. It is best to cut at an angle of 30-degrees, having a point on the end of the cutting.
Strip most of the leaves from the cutting, leaving a few at the end. All the lowest leaves should be removed. Then treat the cutting with a root growth-enhancing powder. Simply dip the cutting into the powder and then place it in water, soil, or whatever growing medium you have selected. Some plants, like philodendron, do very well when cuttings are grown in plain water. Woodier plants should be placed in the soil in most cases.
If using water, place a very week fertilizer liquid into the water to provide added nutrition. Place the cutting away from direct sunlight so that it gets off to a good start. If planting in soil, no fertilizer should be applied right away but the cutting should be placed in partial shade.
You must keep your cutting moist to keep it growing well. However, avoid applying too much water, since this can cause the tender roots to begin rotting instead of thriving. You can mist the cuttings you are growing frequently without the danger of too much water. Never allow the plants you are growing from cuttings to sit in water in the bottom drain pan. This will surely stunt them or kill them completely.
Once roots form, you can plant your cuttings in their final homes, either pots or in the outdoor soil. Carefully transplant and keep the newly planted young specimen out of direct sun and well-watered for a few days as it becomes accustomed to its new home.
Of course, if you are growing plants from cuttings to share with friends, you can give the newly propagated plant to your friend and allow them to place it in its final home. You’ll find your friends appreciate the gift and will very likely ask which of their plants you would like to have cuttings from and, thereby, return the favor.
Free Plants, Propagating Plants from Cuttings
Do you really need Greenhouse or Heated Propagating trays?
There are plenty of articles and websites on the internet where you can learn how to propagate plants from cuttings. Most require some degree of expertise, a greenhouse or heated propagating tray, and a bit of an investment in your cost and time. But here’s a really quick, easy, and cost-effective way for the home gardener to propagate a few extra free plants for the home garden.
This is a method I learned from my mother a few years ago and she’s been using it to propagate lavenders and all sorts of similar plants for years. I’d hate to guess the number of plants she’s propagated over the years from cuttings using this method. One of her favorite things to do in the garden was to plant lavender hedges so she must have propagated hundreds of lavenders using this method.
So here’s what you do;

Then take the cuttings early in the morning before the sun gets too hot. Now having said all of that I threw caution to the wind as today was a cold wet day and I really only decided to do this at lunchtime so I just went ahead took the cuttings anyway. We’ll see what happens.

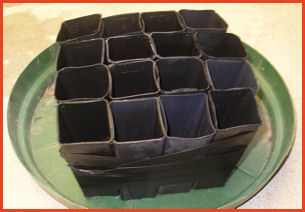
Next, I use a middle-of-the-range potting mix as a propagating medium. Now I know you’ve probably all heard that you should use a special propagating medium that’s made up of all sorts of stuff that will maximize the chances of your cuttings developing roots. I’ve tried these in the past and they obviously work but I’ve found that potting mix does as well. So it’s up to you. If you want to spend the extra money on the propagating mix then that’s fine.
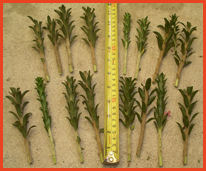
Next up I prepare my cuttings.

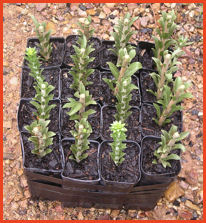
Then just water them in, put them in a shady, cool area, and then just be patient. I don’t use a greenhouse or plastic bag to keep them dehydrated. Just keep them in a cool area and keep them damp.
Then just sit back and be patient. How you go about this is up to you. I’ve read some really in-depth methods about this in the past that make it sound like it’s some new type of science. I just cut them to length and then put a small nick in the end that goes into the potting mix. If you want you can experiment with different types of cuttings from different parts of the plant.
I’ve done this on the 2nd day of winter so they probably won’t be ready until spring. In the warmer months, they will obviously be a bit quicker.

Plants that I’ve propagated from cuttings using this simple method are Banksias, Proteas, Leucadendrons, and Eremophila. Others include Succulents, Cactus, Dracaenas, Yuccas, Aloes, and Agaves, but these are easy to propagate anyway as you can propagate most of these by just placing a cutting in the ground.
So do you really need Greenhouse or Heated Propagating trays to propagate plants from cuttings? Well if you’ve already got this equipment then why wouldn’t you want to use it? But if you haven’t, then why not give this method a try. Experimenting in the garden is fun and so is propagating plants from cuttings. It’s a great way to grow lots of free plants especially if you want to grow a hedge. Let me know how you go.


